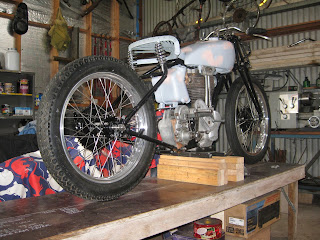
At last it looks like a bike ! the main difference being the wheels , in the last post I had the hubs and brakes sorted but no rims . I was in the fortunate position of having bought a 21 " alloy rim at the Bendigo swap two years ago and having a 19 " alloy rim on the front of my Commando, so I ordered a new 19 " stainless rim and stainless spoke sets for the front and back of the model 18 . I fitted the new SS rim with a good set of zinc spokes onto the Commando and spoked up both alloys with the SS spokes, I had a hiccup with spoke lengths [ my fault ] and had to get 10 more spokes 10 mm longer than the ones I had , Fastline Spokes in Broadford were great and had ten custom made and delivered in less than a week ! Fastline spokes is run by Bruce Lotherington phone 0411844169 or e- mail fastline7@bigpond.com
 From the back fitted up with 40 year old tyres to keep it off the ground , these will need to be replaced before the red plates go on , not painted as yet the rear guard and stays have been fitted up and removed for paint the seat is another treasure from last years Ballarat swap its a middle size frame and came with a grey vinyl cover in rather good nick I'll dye it black and have a look at it then . I recently rang another Norton man in Tassie looking for parts and realised that I had got from Steve the frame ,a brake drum ,crank pinion , rocker box , push rod tubes and gland nuts and some more bits I've forgotten forks from Canberra gearbox shell from Perth bottom end Sydney tank from up on the Murray , could think of this as a "interstate " The bottom end has been interesting to say the least , the cases I am using are stamped 1937 on the inside in small letters and on the outside are stamped 82 x 113 and the serial number on the other side ,they came with a steel crank and 7 1/2 " conrod , but I will be using a pair of cast iron wheels and 7 " rod from a 490 cc motor .The timing chest cover that I will use is actually a 1938 or 39 as it has no oil pressure tell tale and the timing cover has 3 screws and no oval ridge ,I think Norton ran tell tale and ridged cover with 2 screws until 1937 and then changed over . I might add that the cover in the pic is not the one I will use ,it is a 3 screw cover but has the tell tale as well , who knows if there was a model with ridged cover that had 3 screws ???
 A barrel of laughs .... Norton motors with open valves[ up to 1938] had parallel push rod tubes ,logicaly enough and would be the norm in the industry at the time , but in 1938 when the company closed in the valvegear the rocker ball ends ended up closer together at the top with both covers almost touching . This was the start of the famous ES2 motor look with the tapering to the top pushrod covers that can be picked out on old photos identifing the bike as a Norton .The next change come in 1948 when they changed the crankcase deleting the finger followers shrinking the timing chest and taking a few mm off the flywheel , the rocker box became one piece instead of three and likewise the rockers .At the top the ball ends actually spread a little but the bottom end now centred over the cam spindles and not overhung on the fingers . So from 1948 to about 1955 the tapered tubes stayed .


